Topic 13.2 Notes – Images Formed by Mirrors
1. What Images Formed by Mirrors Are
An image is the location where reflected light rays either actually meet or appear to come from.
All mirrors follow the law of reflection
Angle of incidence = angle of reflection.
From there, images fall into two categories.
Real vs. Virtual Images
Real image
- Reflected rays physically intersect.
- Light actually passes through the image point.
- Can be projected on a screen.
- For mirrors, only a concave mirror can make a real image (when the object is outside the focal length).
Virtual image
- Reflected rays diverge, but their backward extensions intersect.
- Light does not pass through the image location.
- Cannot be projected on a screen.
- Formed by plane mirrors, convex mirrors, and concave mirrors (if the object is inside the focal length).
Images can also be:
- Upright or inverted
- Reduced, enlarged, or same size
On FRQs, you’re often asked to justify real vs. virtual in words. Say something like: “The reflected rays converge at a point in front of the mirror, so the image is real.” That physical reasoning matters.
2. Types of Mirrors and Their Focal Points
All spherical mirrors have a principal axis, a center of curvature (C), and a focal point (F).
For spherical mirrors:
where is the radius of curvature.
Plane Mirrors
- Flat surface.
- Parallel rays stay parallel after reflection.
- Focal point is at infinity.
- Image is:
- Always virtual
- Always upright
- Same size as object
- Same distance behind mirror as object is in front
For plane mirrors:
That negative sign means the image is behind the mirror.
Concave Mirrors (Converging)
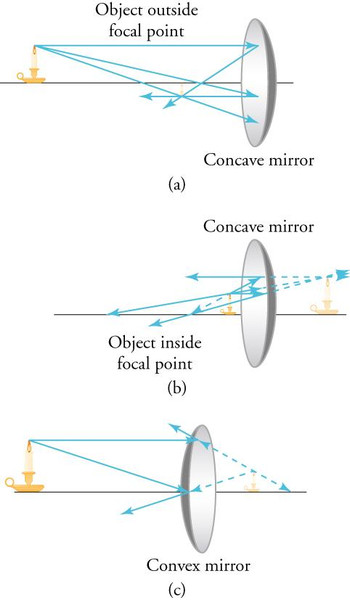
The top two panels of the diagram below show the two key concave mirror cases.
- Curve inward.
- Parallel rays reflect through the focal point.
- Focal point is in front of mirror.
Image behavior depends on object location:
- Outside focal length → real, inverted (size varies)
- Inside focal length → virtual, upright, enlarged
This “inside vs. outside focal length” idea shows up constantly on conceptual multiple choice.
Convex Mirrors (Diverging)
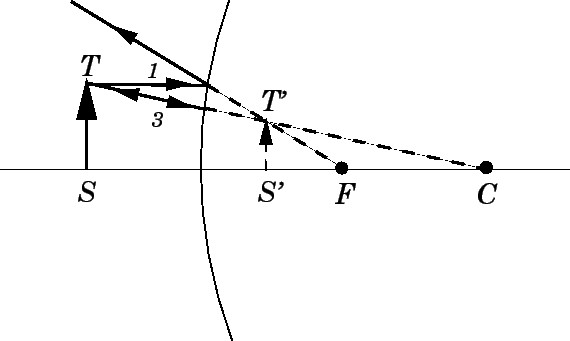
The ray diagram below shows how reflected rays spread out and appear to come from a point behind the mirror.
- Curve outward.
- Parallel rays reflect and diverge as if from focal point behind mirror.
- Focal point is virtual.
Image is always:
- Virtual
- Upright
- Reduced
That’s why side-view mirrors make cars look smaller.
3. The Mirror Equation and Sign Conventions
The mirror equation connects everything:
- = object distance
- = image distance
- = focal length
Sign Rules You Must Memorize
- Object in front →
- Real image →
- Virtual image →
- Concave →
- Convex →
Quick example:
A concave mirror with , object at .
So . Positive → real image.
On AP problems, the sign tells you the physics before you even finish calculating.
4. Magnification and What It Tells You
- → upright
- → inverted
- → enlarged
- → reduced
Using the previous example:
- Negative → inverted
- Magnitude 2 → twice as tall
Plane mirror gives . Same size, upright.
Students often forget that magnification sign matches orientation. The math tells the story.
5. Ray Diagrams for Mirrors
Ray diagrams let you determine image location and type visually.
The Three Principal Rays
- Parallel ray
- Parallel to axis.
- Concave → through F.
- Convex → reflects as if from F.
- Focal ray
- Through F.
- Reflects parallel to axis.
- Vertex ray (normal ray)
- Hits the mirror where the principal axis meets the surface.
- Reflects symmetrically about the principal axis (angle of incidence = angle of reflection).
How to Use Them
- Draw two rays from top of object.
- Reflect them properly.
- Find intersection.
- Real intersection → real image.
- Only backward extensions meet → virtual.
Your algebra and ray diagram must agree. If your math gives , your diagram should show a virtual image behind the mirror.
